Superior Plumbing & Heating
Order a plumber (866) 932-2818
book now
Fix My Water Line Without Digging

Weak Water Pressure or High Bills? Fix Your Main Water Line the Trenchless Way!

If you’re dealing with low water pressure or your water bill keeps rising for no obvious reason, we bet you’d never suspect your main water line. But do you really need to tear up your yard or drive to fix it?

Fix My Water Line Without Digging

None of that is necessary! There’s a smarter and cheaper way to handle it, and it’s called trenchless main water line repair.

Two Main Methods of Trenchless Water Main Line Repair and Which One’s Right for You?

There are two ways a trenchless repair gets done, and which one your plumber recommends comes down entirely to what the camera finds when it goes through your pipe. Let’s break them down!

  • Method #1

    Pipe Lining (Cured-in-Place Pipe, or CIPP)

     Pipe Lining (Cured-in-Place Pipe, or CIPP)

    Think of this as giving your existing pipe a brand new interior. Yes, that’s how it works!

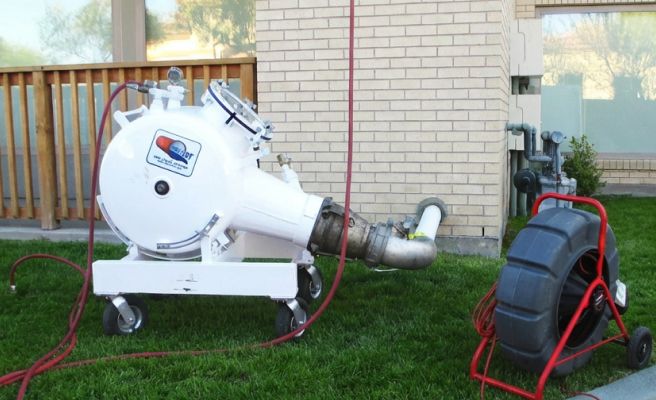
    How it works: A plumber feeds a flexible, resin-soaked liner into your damaged pipe through a small access point. Once it’s in place, they inflate it so it hugs the inside walls perfectly, then cure it, usually with hot water, steam, or UV light, until it hardens. The result? A brand-new pipe inside your old one, without digging up your yard.

    What it fixes: Many things, like cracks, corrosion, roots, rough or scaled interiors, and tiny gaps at joints. Basically, any pipe that’s damaged but still strong enough to hold the liner.

    Why it’s special: You get a smooth pipe with no joints. There are no gaps for roots to enter and no rough spots for buildup. It bonds to your existing pipe, making it stronger than what you had before.

    What it requires: For this method to work, your pipe needs to be mostly intact. If it’s completely collapsed or twisted, the liner can’t get through and lining alone won’t do the job.

    How long it lasts: A properly installed liner can last 50 years or more.

    Trenchless Repair by the Numbers
    1–2 days is usually what it takes to perform most residential trenchless water line repairs.
    50+ years is the average lifespan of a properly installed pipe liner
    2 access points are typically needed, with no full trench required
    $0 is the cost of landscape restoration because there’s nothing to restore

  • Method #2

    Pipe Bursting

    Pipe Bursting

    This one is for pipes that cannot be fixed, like ones that have collapsed, are heavily worn, or where a liner wouldn’t hold up over the long term.

    How it works: If your old pipe is beyond repair, a plumber pulls a hydraulic bursting head through the damaged pipe, breaking it apart as it goes, while a brand-new pipe is pulled in behind it. In the end, you get a completely new line, all without tearing up your yard.

    What it fixes: This method is used for completely failed pipes, severely damaged sections, or pipes that are too small for your household’s needs.

    Why it’s special: The best thing is that you’re not patching but replacing the old line. The new HDPE pipe is super durable, resists root intrusion, and has a smooth interior that keeps water flowing easily and prevents buildup.

    What it requires: The requirements are not strict, but they matter. There must be enough space around the old pipe, and in tight spots or near other utilities, trenchless repair might not be the best choice.

    How long it lasts: Once installed, these pipes are built to last for decades.

    Whatever method is chosen, your lawn stays where it is. Your driveway stays where it is. Your garden, your interlock, and your mature trees will be untouched.

How the Whole Thing Works. Explained in 3 Steps

You can say goodbye to messy digging once you know how the process works, from start to finish, in just three simple steps:

  • Step # 1

    A plumber inspects your lines

    A plumber inspects your lines

    First, a plumber sends a high-resolution camera through your water line. You can actually watch with them to see every inch of the pipe. This lets the plumber pinpoint exactly where the damage is, how long the affected section is, and what type of problem you’re dealing with, whether it’s cracks, corrosion, or hidden leaks.

  • Step #2

    A plumber repairs your line

    2. A plumber repairs your line

    Now the most exciting part: your main water line will be fixed without tearing up your yard, and there are two options for how to perform the repair.

    • If your pipe can be lined: The plumber cleans it first, then feeds a flexible, resin-soaked liner into the pipe through a small access point. It inflates and bonds to the interior walls, curing into a smooth, strong “pipe within a pipe.” What about cracks, rough surfaces, or small leaks? Rest assured, they will be gone.
    • If your pipe needs bursting: In this case, the plumber pulls a bursting head through the old pipe, breaking it outward while simultaneously pulling a brand-new HDPE pipe into place. What you get is a new line that resists roots, corrosion, and buildup and can even be upsized if needed.

    Once the repair is finished, the plumber closes the access points and cleans up. Yes, that’s it!

  • Step #3

    A plumber checks everything before leaving

    A plumber checks everything before leaving

    Before you call it done, the plumber runs the camera through your pipe again to confirm the repair is complete, the new lining or pipe is perfectly installed, and your water flow is back to full strength and not leaking.

    Even though trenchless repair is the smartest choice for many plumbing problems, it’s not always an option. Why? If the pipe has fully collapsed over a long section, or if there are sharp bends that prevent a liner or bursting head from passing, traditional excavation may be necessary. That’s why a plumber starts with a camera inspection to tell you which situation you’re actually in before you spend any money.

Rate this post:
Average rating: 5/5
Total votes: 1
Share:
Book Now